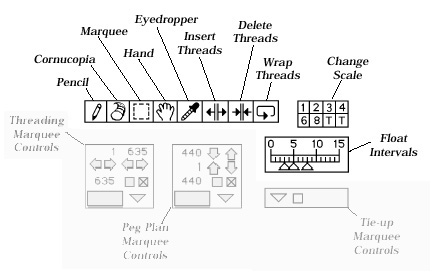
| The Tools Window is a small window which floats above the others whenever
WeaveMaker is active (see detailed view below). Note: the areas "grayed out" in the illustration below will be covered later in Section 6: "Block Tools."
Its tools help you manipulate structure and color. You choose a tool by clicking on it. It turns black, confirming your choice. The cursor also changes its shape (to remind you of which tool you have activated) when you position it over apart of the screen where it's appropriate to use the selected tool. So, if you click on the pencil tool, the cursor will remain the standard cursor until you move it over one of the grids in the draft, at shich point the cursor will change to the pencil. This behavior helps you determine where it is appropriate to use the tool. The information below explains all the tools in detail. ou can move this window around on the screen, or hide it by clicking in its close box. Make it visible again using “Show Tools” in the “Windows” menu. |
||
 Pencil Pencil
Use the pencil tool to edit the threading, treadling, tie-up, or peg plan grids. Click with the pencil to attach/detach a thread from a harness, add/remove a tie-up or peg, or edit the treadling. Clicking on a square reverses its color. If you hold the mouse down and move it around, the change occurs in each place the pencil passes over.
Click on the Cornucopia tool and then position the cursor over any of the grids in the design window (threading, tie-up, treadling, peg plan, or color bar). The cursor changes to a cornucopia. Click and watch WeaveMaker generate a new design. If you click in the threading, WeaveMaker generates a new threading and then draws the new fabric. Its behavior is similar if you click in the tie-up, treadling, or peg plan. If you click in the color bar, you get a new color arrangement. You can click over and over with the Cornucopia; each time you get a new pattern. Unless you restrict it, the Cornucopia fills the entire grid. You can restrict its range of operation using the marquee tool (please see “Marquee” in the Index for places to find out about using the marquee). If you draw a marquee, the Cornucopia can be used inside the marquee, and whatever pattern it puts there is then repeated following the repeat block rules (please see “Repeat Blocks” in the Index for places to find more about using repeat blocks). Through the Schemes window you can encourage the Cornucopia to draw certain kinds of patterns (please see “Schemes” in the Index for more about the schemes window). In addition, of course, you have control over where you click with the Cornucopia. For example, if you have already threaded your loom you probably do not want a new threading generated spontane-ously, so you would be careful to avoid clicking in the threading in such a case. WeaveMaker also has an “automatic” mode where the spontaneous pattern generator (the engine which drives the Cornucopia) creates a complete fabric every few seconds. Each pattern stays on the screen long enough for you to “freeze” it in place if you like it. Please see “Schemes” in the Index for more about automatic spontaneous pattern generation. Regardless of how you use it, any design created by the spontaneous pattern generator may be further edited, just as you would edit a pattern you created from scratch. All the power of all the WeaveMaker tools is available for making modifications.
| ||
|
(Although you cannot see it here,
when you do this for real you
will see the dashed box outline
“crawl.” The Macintosh terminology
for this is “marquee,”
because it’s like the lights
around a movie theater or hotel
marquee.)
Dismiss the marquee by unchecking the marquee checkbox in the Tools window (please see “Marquee” in the Index for details).
Shortcut: hold down the Option key to temporarily select the Hand tool.
You can also change size of a
marquee through the Tools win-dow.
Please see “Marquee,
resizing” in the Index for details.
The keyboard cursor keys will
move a marquee by exactly its
width or height. A marquee in
the threading, for example, is
moved to the left (right) by the left
(right) arrow cursor key. If the
marquee is 20 threads wide, it
will move by 20 threads each time
the cursor key is pressed. Simi-larly,
the up (down) keyboard
cursor keys move a marquee in
the weft by exactly its height.
A similar effect is possible in any
of the other grids.
Also, note that as you move a
grid element around, parallel
changes take place in the other
grids. This ensures that your
shuffling does not change the
fabric design one whit.
The shuffle may be used to
simplify threadings or
treadlings. It can also help you
study your design by letting you
move harnesses next to each
other, which may make it easier
to compare them. If you are
training an assistant in dobby
weaving, the shuffle is a good
teaching tool, as it helps illuminate
the relationship among the
grids.
If used within an active marquee
(please see “Marquee” in
the Index for details), only the
area within the marquee is
shifted.
The Wrap tool does not throw
anything away; ends or picks
shifted out of one end reenter
on the opposite end.
Float Intervals
the left triangle indicates 3, the middle 5, and right one 8. This means that WeaveMaker will use these rules in showing floats:
|

WeaveMaker User's Manual — Tools Menu
 Cornucopia
 Marquee
 or fat
 depending on the scale
that is in effect.
depending on the scale
that is in effect.

 Eyedropper
 Hand (Resize a marquee
 Insert Threads
 Delete Threads
 Wrap
Wrap
 Change Scale
